• Categories

  • Archives

  • Meta

Homemade Applesauce

I’ve always liked applesauce, and lately I’ve really enjoyed eating it as part of breakfast.  And since I always prefer homemade versions of food, I wanted to try a homemade version.  I found one that looked promising, and couldn’t wait to try it out.  Homemade applesauce is actually quite easy.  After slicing the apples, you simply mix them in a pot with the other ingredients and simmer for about 20-30 minutes, or until the apples are tender.  Once the apples are tender, you just mash them (I used my immersion blender) until you get the right consistency.  You can have chunky or smooth applesauce depending on your preference.  My applesauce is darker than the original, but that probably is because I used ground cinnamon rather than a cinnamon stick.  This was a great version and was full of cinnamon flavor.  I loved having this for breakfast every morning!

Homemade Applesauce
Source: slightly adapted from Simply Recipes

Ingredients

  • 3 to 4 lbs of peeled, cored, and quartered apples. (Make sure you use a good cooking apple like Golden Delicious, Granny Smith, Fuji, Jonathan, Mcintosh, or Gravenstein.)
  • 4 strips of lemon peel – use a vegetable peeler to strip 4 lengths
  • Juice of one lemon, about 3-4 Tbsp
  • 3 inches of cinnamon stick (I used 2 teaspoons ground cinnamon)
  • 1/4 cup of dark brown sugar
  • up to 1/4 cup of white sugar
  • 1 cup of water
  • 1/2 teaspoon of salt

Method

1 Put all ingredients into a large pot. Cover. Bring to boil. Lower heat and simmer for 20-30 minutes.

2 Remove from heat. Remove cinnamon sticks and lemon peels. Mash with potato masher.

Ready to serve, either hot or refrigerated. Delicious with vanilla ice cream or vanilla yogurt.

Freezes easily, lasts up to one year in a cold freezer.

Homemade Refried Beans

David and I are known for cooking Mexican food.  We typically have a Mexican dish for dinner at least once a week.  I haven’t included many recipes in my blog because Mexican food can be so hard to photograph sometimes with the color of the tortillas and the oozing cheese.  However, I just had to share these beans with you.  Even though I’ve been making this recipe since March or April, I finally decided that I couldn’t wait any longer!

We love tacos for dinner.  Tacos may seem very ordinary, but they are made special by using homemade refried beans.  Making refried beans at home is surprisingly easy, and you can make a big batch and freeze leftovers for future use.  This recipe starts off by cooking onions.  It is important to cook the onions until they are very browned for the best flavor.  When you mash the beans, you can make them as chunky or as smooth as you want.  Once you make these at home, you will never go back to the can again!

Homemade Refried Beans
Source: Adapted from The Joy of Cooking

1 medium onion, chopped fine
canola oil
2 cloves minced garlic
2 (15-ounce) cans pinto beans, undrained

Heat canola oil on medium-high (I like to use my Dutch oven for this, but any medium-sized pot will work).  Add onion and cook until nice and browned, about 8-10 minutes.  Add garlic; cook until fragrant, about 30 seconds.  Lower heat to medium and add pinto beans, about half a can at a time.  Using a masher, mash beans until desired consistency (you don’t need to completely mash before adding more beans).  Keep on heat until it reaches desired thickness (this should only take a couple of minutes).  Serve and enjoy!

Black Bean and Corn Salad

DSC_2160

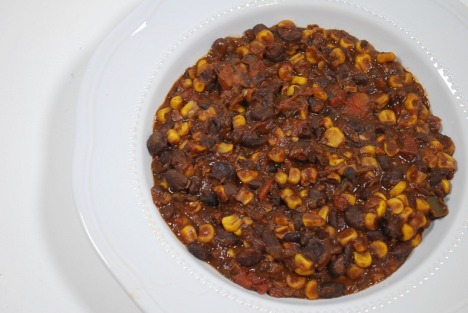
I was thinking about a side dish for a Mexican meal one night and after looking at the ingredients in my pantry, I came up with this black bean and corn salad.  It has many of my favorite ingredients and flavors and they go so well together.  It’s just spicy enough and makes the perfect side dish.  If you don’t like things spicy, you could just substitute a can of regular tomatoes instead of the Rotel, but I really urge you to give the (mild) Rotel a chance!  This reminded me of how much I love black beans and corn together.  The spices gave it just the right amount of heat.  I let it simmer to thicken enough to use as a side dish, but I think this would also be good as a dip if you don’t cook it as much.  I also used it as a delicious filling for enchiladas.  This is a great multi-purpose dish for any occasion!

Black Bean and Corn Salad
Source: A Dinner & Dessert Original

Olive oil for sautéing

1 yellow onion, chopped

2 cloves chopped fresh garlic

1 (15-ounce) can black beans with juices

1 (15-ounce) can Rotel tomatoes

1 (15-ounce) can corn

2-3 teaspoons cumin

2 tablespoons chili powder

1/2 teaspoon salt

2 teaspoons lime juice

Sauté onion in olive oil until softened.  Add garlic and stir for 30 seconds, or until fragrant.  Add remaining ingredients.  Simmer for about 30 minutes, or until thickened (less if you want to use it as a dip).

Twiced Baked Potatoes with Broccoli and Cheddar

DSC_1214

I just love potatoes in any form- scalloped, baked, mashed, roasted, and whatever else you can come up with, but my I think my favorite way is twice-baked.  This was the first time I actually made them myself, but my mom has made them many times, mostly as a side for special meals like Easter or birthday dinners.  When I saw this particular combination, I knew that it would be delicious.  I like broccoli and cheddar together, and when added to potatoes, you can’t go wrong!

I made these on a night after David had been sick for a few days and was starting to get his appetite back, and I was in the mood for a lighter meal.  If you eat a whole potato, these are a great one-dish meal, but you could also have half of a potato and serve it as a side dish.  I omitted the scallions because I didn’t have them on hand, but next time I will be sure to include them because they would add even more flavor to this dish.  The potato filling was perfect- light and fluffy, and baked just right.  I love the crisp bites of cheese that form a crust on the outside of a potato, and the mixture of the cheese and broccoli is just right.  Bridget notes that this is heavy on broccoli, but I really enjoy broccoli, so I kept the same proportions she used.  These are the best twice-baked potatoes I’ve ever had, and I will continue to use this combination in the future.

DSC_1217

Twice-Baked Potatoes with Broccoli, Cheddar, and Scallions
Source: The Way the Cookie Crumbles

Serves 2

2 medium to large baking (russet) potatoes
2 small (or 1 large) broccoli crowns, cut into 1-inch florets with stems no longer than 1 inch
½ teaspoon lemon juice
1 tablespoon butter, softened
½ cup buttermilk
1 scallion, sliced then
1 ounce (¼ cup) cheddar, plus ½ ounce (2 tablespoons)
salt
black pepper

1. Move an oven rack to the middle position and heat the oven to 400 degrees. Scrub the potatoes and stab them several times with a fork. Place them on the oven rack and bake until a fork inserted into the potato meets no resistance, 60-75 minutes.

2. Remove the potatoes from the oven and set them aside until they’re cool enough to handle. Heat the broiler. Meanwhile, bring 1 inch of water to a boil in a large saucepan over high heat. Place the broccoli florets in a steamer basket and put the steamer basket in the saucepan, making sure that the water does not come into contact with the broccoli. Cover the pot and steam for 4 minutes, until the broccoli is just crisp-tender. (You want it more on the crisp side, since they’ll continue to cook as they cool, plus they’ll spend some time under the broiler.) Remove the steamer basket with the broccoli from the saucepan and discard the water in the pot. Dump the broccoli into the pot and season with a pinch of salt and the lemon juice.

3. Cut the potatoes in half lengthwise. Using a spoon, scoop out the flesh of the potatoes, leaving a thin coating on the potato skin. In a medium bowl, use a potato masher to mash the potato flesh with the butter. Stir in ¼ teaspoon salt, a pinch of ground black pepper, the broccoli, plus the remaining ingredients, except ½ ounce cheddar.

4. Spoon the filling into the potato shells and top with the remaining cheddar. Place the potatoes on a baking sheet and broil until the cheese is spotty brown and the tops are crisp. Serve immediately.


Homemade Baked Beans

DSC_1341

I have always loved baked beans, and I have wanted to try a homemade version for a while now.  In the past, I’ve alwasy gotten a can of Bush’s Baked Beans and doctored them up a little bit, but I wanted to see if the homemade version was much different.  I have also been trying to use my Joy of Cooking cookbook more, so I decided to try a recipe from there.

Homemade baked beans do not require a lot of hands-on work, but they do bake for quite a while (at least 4 hours) in the oven, so it is something that you need to plan ahead for.  After simmering the beans until they are tender, you mix them with the flavorings and seasonings and bake until they are done, which you will know by texture.  I really like the flavor that the bacon adds, but you can leave it out if you want these to be vegetarian-friendly.  I made a huge batch of beans, and found that they freeze well, and that is something I would recommend doing, so you can have good baked beans on hand without having to plan ahead.  These would be great for summer cookouts that you may have coming up!

DSC_1337

Baked Beans
Adapted from The Joy of Cooking

1 ½ cups dried white beans or navy beans, rinsed and picked over

½ cup boiling water or beer

¼ cup chopped onion

3 tablespoons molasses

3 tablespoons ketchup

1 tablespoon dry mustard

1 tablespoon Worcestershire sauce, optional (I recommend adding this!)

1 teaspoon salt

½ teaspoon vinegar

4 ounces sliced salt pork (I used bacon)

Soak beans.  Drain, then cover with water in a large saucepan.  Bring to a boil, then simmer slowly, covered, until tender, 45 minutes to 1 hour.

Preheat the oven to 250 degrees.

Drain the beans, reserving the cooking water.  Combine the beans in a greased casserole dish with remaining ingredients, placing the pork on top.  Bake, covered, 4 to 4 ½ hours; uncover for the last hour of cooking.  If they become too dry, add a little chicken broth or reserved bean water.

Maple-Roasted Butternut Squash

dsc_0824

Ina Garten’s latest book, Barefoot Contessa: Back to Basics, is becoming one of my favorite cookbooks for dinner ideas.  There are so many things that I want to make, and I can’t wait to try it!  The other night I made roasted chicken, and thought this butternut squash dish would be a perfect side.  I know butternut squash is usually a more fall-ish dish, but I really wanted some, and decided to make it anyway 🙂  I have only had butternut squash once before.  It was around holiday time a little over a year ago, and I don’t even remember how it was prepared; I just remember that I really liked it.  Preparing the squash is really easy, and it helps to have a strong, sturdy knife for the job.

We really loved this.  The maple flavoring was perfect, and the simple seasonings really brought out the flavor.  The addition of bacon or pancetta also adds a great depth to the dish.  I didn’t have pancetta, so I decided to just use the bacon that I already had on hand.  Roasting the squash gave it a nice, tender texture.  I ended up eating more of this than the chicken, and I thing it would be a great main dish on its own.  We are already planning on making this a part of our Thanksgiving menu.  We both decided that we should make eating butternut squash a more regular event!

Maple-Roasted Butternut Squash

1 large butternut squash

1 head garlic, separated but not peeled

2 tablespoons good olive oil

2 ½ tablespoons pure maple syrup

1 teaspoon kosher salt

½ teaspoon freshly ground black pepper

2 ounces thinly sliced pancetta, chopped (I used bacon)

16 whole fresh sage leaves (I subbed dried)

French Bread, for serving

Preheat the oven to 400 degrees.
Peel and seed the butternut squash and then cut it into 3/4- to 1-inch cubes.  Place the squash and the whole unpeeled garlic cloves on a sheet pan in one layer.  Toss with the olive oil, maple syrup, salt, and pepper, and bake for 20 to 30 minutes, or until the squash begins to brown, turning once during baking.

Sprinkle the pancetta and the sage leaves evenly over the butternut squash and continue to bake for another 20 to 30 minutes, until the squash and garlic are tender and caramelized.  Season to taste and serve hot with French bread for guests to spread with the roasted garlic.

Source: Barefoot Contessa: Back to Basics by Ina Garten

Mexican Rice

David and I are big fans of Mexican food. We eat at Mexican restaurants often, but lately have been making more Mexican food at home. One of the things we love most at Mexican restaurants is the rice.  I love eating rice and refried beans together along with a delicious, warm Mexican dish (usually enchiladas for me).  I found this recipe and decided to try it to see if it would compare to the wonderful rice we get at our favorite restaurants.  It was definitely everything we were looking for. I think this is even better than what we have in restaurants because it is so moist and flavorful.  I think that sometimes rice like this tends to be too much on the dry side.   This rice had a great flavor, and is wonderful on its own as a side dish, or in burritos (which is the way we usually eat it). I am so glad we discovered this recipe, because we make this rice all the time now to go with burritos, quesadillas, fajitas, enchiladas, and all of our other favorite Mexican dishes.  It makes a ton of rice, but I have had much luck freezing it (smaller portions work best) and reheating it when I need it.  I would actually recommend this because this rice does tend to take a while, and this way you can quickly freeze it and have it ready quickly for the perfect Mexican meal!

I am also submitting this to the Eat to the Beat event over at Elly Says Opa!  This rice makes me think of the song “Mexico” by James Taylor.  Wouldn’t it be so nice to be in Mexico, eating some great food and drinking Margaritas?  That sounds perfect to me after the cold winter months.  But, for now, I’ll just have to dream of laying on the beach in the warm sun 🙂

eat-to-the-beat

Mexican Rice (source: Cook’s Illustrated September 2004)

2 ripe tomatoes (about 12 ounces), cored and quartered

1 medium onion, preferably white, peeled, trimmed of root end, and quartered

3 medium jalapeno chiles

2 cups long grain white rice

1/3 cup canola oil

4 cloves garlic, minced or pressed through garlic press (about 4 teaspoons)

2 cups low-sodium chicken broth (or vegetable broth)

1 tablespoon tomato paste

1 ½ teaspoons table salt

½ cup minced fresh cilantro leaves (I omitted this)

1 lime, cut into wedges for serving

Adjust oven rack to middle position and heat oven to 350 degrees. Process tomatoes and onion in food processor until smooth and thoroughly pureed, about 15 seconds, scraping down bowl if necessary. Transfer mixture to liquid measuring cup; you should have 2 cups (if necessary, spoon off excess so that volume equals 2 cups). Remove ribs and seeds from 2 jalapeños and discard; mince flesh and set aside. Mince remaining jalapeño, including ribs and seeds; set aside.

Place rice in large fine-mesh strainer and rinse under cold running water until water runs clear, about 1 1/2 minutes. Shake rice vigorously in strainer to remove all excess water.

Heat oil in heavy-bottomed ovensafe 12-inch straight-sided sauté pan or Dutch oven with tight-fitting lid over medium-high heat, 1 to 2 minutes. Drop 3 or 4 grains rice in oil; if grains sizzle, oil is ready. Add rice and fry, stirring frequently, until rice is light golden and translucent, 6 to 8 minutes. Reduce heat to medium, add garlic and seeded minced jalapeños; cook, stirring constantly, until fragrant, about 1 1/2 minutes. Stir in pureed tomatoes and onions, chicken broth, tomato paste, and salt; increase heat to medium-high and bring to boil. Cover pan and transfer to oven; bake until liquid is absorbed and rice is tender, 30 to 35 minutes, stirring well after 15 minutes.

Stir in cilantro and reserved minced jalapeño with seeds to taste. Serve immediately, passing lime wedges separately.

Chicken Fingers with Ranch Dip and Seasoned Fries


The cooking board that I frequent had a recipe exchange for January and February. We all submitted recipes to one of the members and she was in charge of assigning everyone a recipe to make. The theme of this exchange was healthy meals. The recipe I was assigned to make was Chicken Fingers with Ranch Dip and Seasoned Fries, which is a recipe from Weight Watchers. It was a pretty tasty dish, and definitely different from the usual chicken fingers. I really liked the flavor of the fries. Here’s the recipe adapted from Weight Watchers:

Chicken Fingers with Ranch Dip and Seasoned Fries:
3 sprays cooking spray
1 pound uncooked boneless, skinless chicken breasts, cut into strips
1 tablespoon Dijon mustard
1 cup oatmeal
2 teaspoons garlic herb seasoning, preferably salt-free (I used garlic powder)
1/2 teaspoon table salt (I used kosher salt)
1/4 teaspoon black pepper
2 large Russet potatoes, peeled and cut into strips
1 tablespoon Creole seasoning (I did not have this so I used a mixture of oregano, paprika, and
cayenne)
1/2 cup fat-free Ranch dressing

Preheat oven to 400ºF. Coat a large baking sheet with cooking spray.
Coat chicken strips with mustard. Combine oats, garlic herb seasoning, salt and pepper in a shallow dish. Dip chicken strips in oat mixture and turn to coat; place chicken strips on prepared pan.
Arrange potatoes around chicken on pan; lightly coat both with cooking spray. Sprinkle potatoes with Creole seasoning.
Bake, flipping once, until chicken is cooked through and both chicken and potatoes are tender and golden brown, about 30 minutes. Serve chicken and potatoes with dressing on the side.

Yields about 3 ounces of chicken, 1/2 a potato and 2 tablespoons of dressing per serving (6 WW points)

Macaroni and Cheese

I love macaroni and cheese. I’ve never gotten sick of it. I was searching for a recipe that would be a bit different, and I came upon this one from Emeril. I love the way the Essence adds some kick to the topping and the bread crumb and cheese mixture adds a lot of crunch to the texture. I don’t measure the Essence exactly, but use spices according to my personal tastes to determine how much I use. This mac and cheese also freezes well. I often make half of the recipe because it makes so much. Here’s the wonderful recipe:

6 tablespoons unsalted butter

½ pound elbow macaroni

6 tablespoons all-purpose flour

3 cups whole milk

1 teaspoon salt

¼ teaspoon ground black pepper

Pinch cayenne

2 ½ cups grated Cheddar cheese (about 6 ounces)

½ cup fine bread crumbs

1 teaspoon ESSENCE

Preheat oven to 350. Butter a 2-quart baking dish with 1 tablespoon of the butter and set aside. Bring a large pot of salted water to a boil. Add the macaroni and cook until al dente, about 10 minutes. Drain in a colander and rinse under cold running water. Drain well.

Melt the remaining 5 tablespoons butter in a heavy 3-quart saucepan over medium heat. Add the flour, and stirring constantly with a wooden spoon, cook over medium heat for 3 to 4 minutes, being careful not to let the flour brown. Using a whisk, add the milk in a steady stream and cook, whisking constantly, until thick and smooth, 4 minutes. Remove from the heat. Add the salt, pepper, cayenne, and 2 cups of the cheese, and stir well. Add the noodles and stir well. Pour into the prepared dish.

In a mixing bowl, combine the remaining ½ cup of cheese with the bread crumbs and Essence. Sprinkle evenly over the macaroni and bake until golden brown and bubbly, about 25 minutes.

Remove from the oven and let rest 5 minutes before serving.

YIELD: 6 to 8 servings

ESSENCE:

2 1/2 tablespoons paprika
2 tablespoons salt
2 tablespoons garlic powder
1 tablespoon black pepper
1 tablespoon onion powder
1 tablespoon cayenne pepper
1 tablespoon dried leaf oregano
1 tablespoon dried thyme

Combine all ingredients thoroughly and store in an airtight jar or container. This makes about 2/3 of a cup, but I never actually make it like this. I just add the spices to the cheese and bread crumb mixture the way I want them.

Pineapple Casserole


I never had Pineapple Casserole until David’s mom made it one year for Thanksgiving. With pinapple, cheese, and Ritz crackers, I knew it has to be good! This dish became one of my new favorites. It often makes an appearance at Christmas, Thanksgiving, and Easter dinners, and I like to make it throughout the rest of the year as well. The Ritz crackers give it a nice crunchy texture and the pineapple makes it sweet. I love the flavor the cheddar cheese adds. The cheese and pineapple are a great combination of flavors. We had the Pineapple Casserole with the Rotisserie Chicken and rice. This recipe is from the cookbook published by the Junior League of Columbus, Georgia. I made a few minor adaptations:

Hot Pineapple Casserole:
1 (20-ounce) can pineapple tidbits, drained, reserving 3 tablespoons juice
3 tablespoons all-purpose flour
1/2 cup sugar
1 cup grated cheddar cheese
1 to 1 1/2 cups Ritz cracker crumbs (I usually use about 3/4 of a sleeve)
1/4 cup butter or margarine, cut up

Place pineapple and reserved juice in a greased casserole dish. Mix flour and sugar and sprinkle over pineapple. Sprinkle cheese on top. Top with cracker crumbs and cut-up butter. Bake in preheated, 350-degree oven for 30 minutes.

Yield: 4 to 6 servings
Source: Cookbook from the Junior League of Columbus, Georgia